I love recipes that require almost no work or skill and have great flavor. Today’s meal is sausage and peppers. This meal is a perfect example of simple cooking. You can have this prepped in 10 minutes and leave it in the crock pot for hours. It only gets better!
I use 2 packs of packaged sausages, usually one hot and one sweet. I start by heating up my pan on medium, and while the pan is heating I make a thin slice over each sausage to remove the casings. This is not a requirement, I just prefer no casings. They won’t hurt you, so you don’t have to remove them.
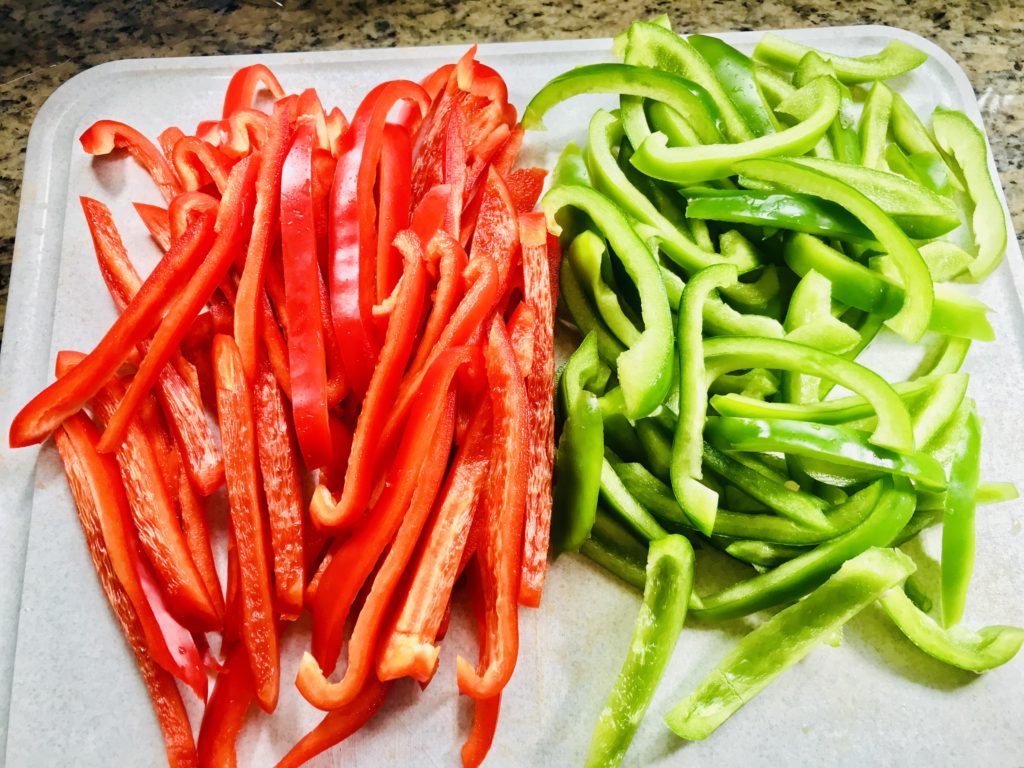
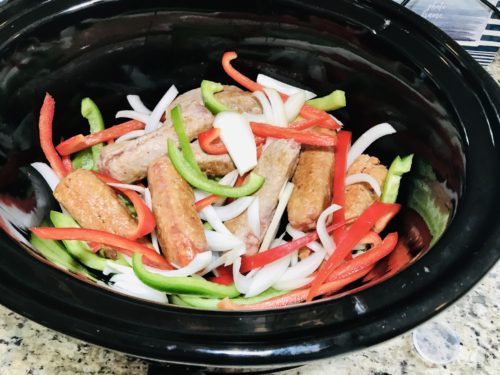
Next I brown the sausages on all sides in the pan. I want them to get a bit of a crust. Once the sausages are done I just throw them in the crock pot. I slice 2 red peppers, 2 green peppers, and 1 onion. Toss the veggies in with the sausages and turn the crock pot to low for 4 hours.
There are some variations. I think they come out perfectly as is, but if you want them to be in more juice you can add some water or chicken broth. I also know some people who add a can of diced tomatoes for another veggie flavor. You can experiment and see what you like!
Freezer ready 🙂
Sausage and peppers is a versatile meal. It can be served at dinner with rice, polenta, or potatoes. It’s also great on some fresh rolls at a party. If you’re low carb, you can also eat them plain! No matter what you decide, I guarantee your belly will be satisfied.
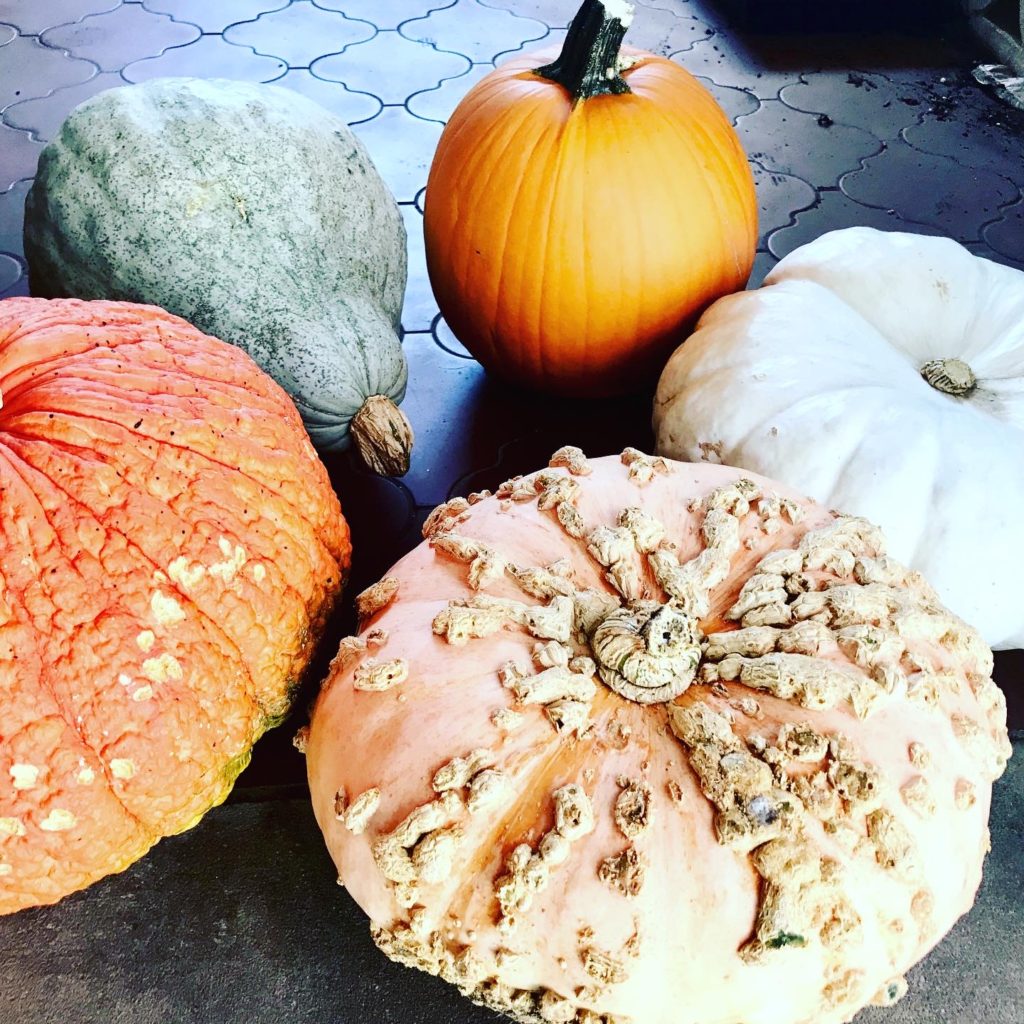
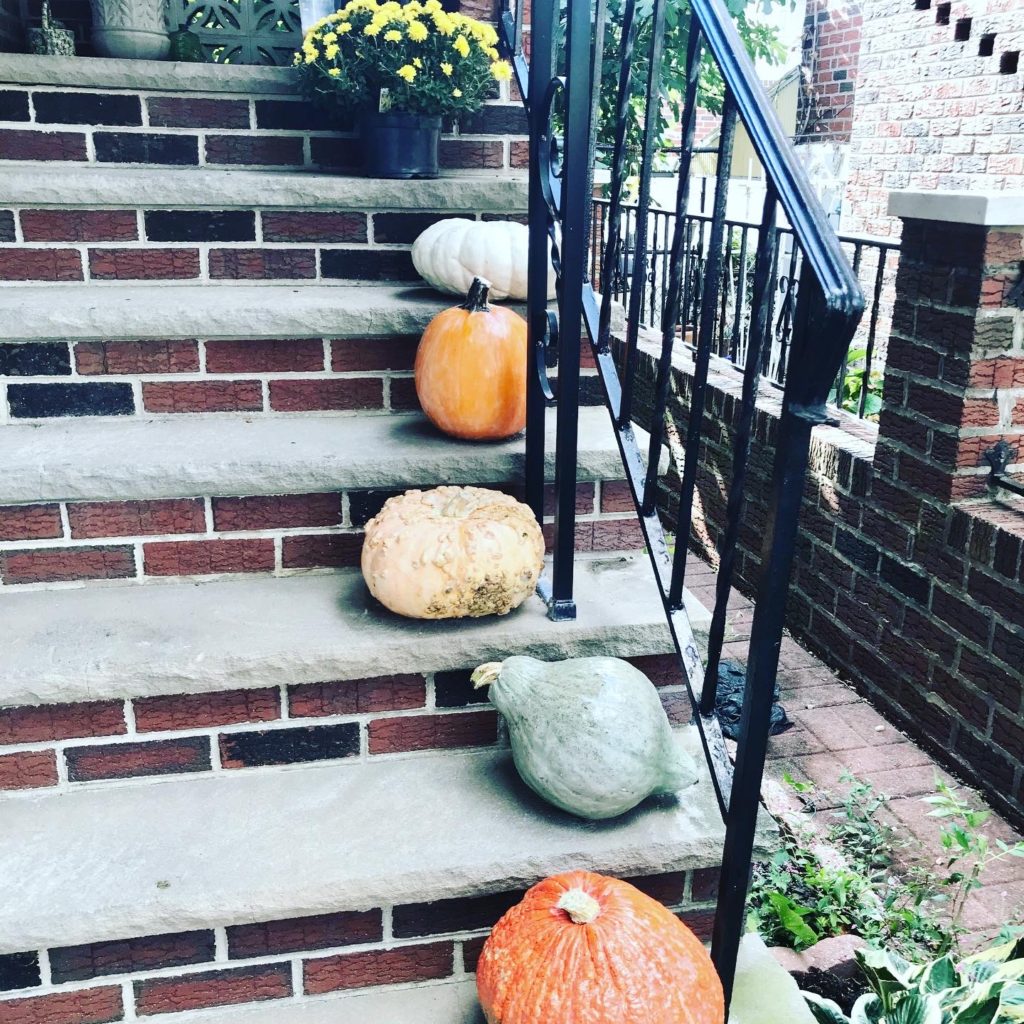
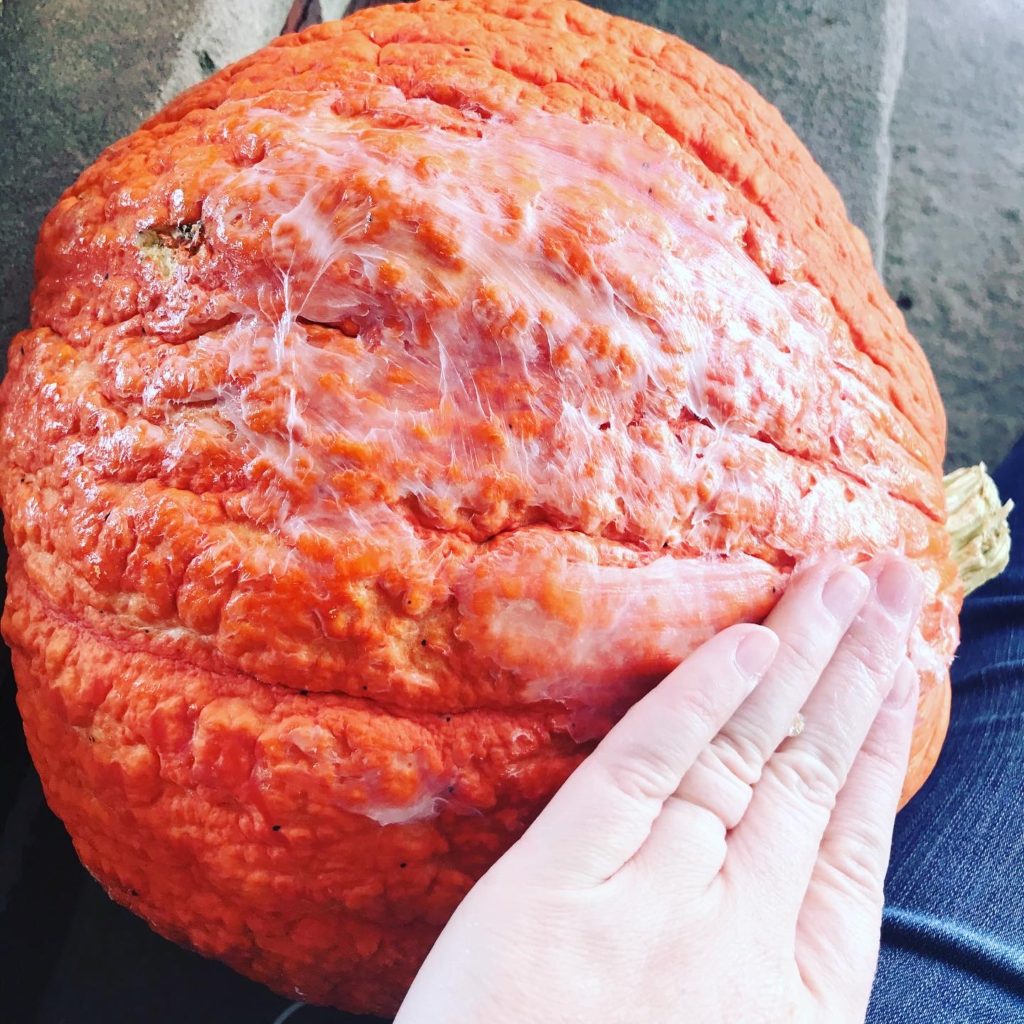
One of my favorite ways to decorate for fall is by placing pumpkins up our steps outside. I also use some mums to make our home look festive and inviting. The first year I got pumpkins, we had issues with squirrels and other critters eating them. I thought I would share the solution!
There’s no fancy tutorial. I just cover the pumpkins in vaseline. The animals may try to bite into the pumpkins, but they’ll stop because they hate the vaseline. As the vaseline dries you can barely see it- if anything it just makes the pumpkins shine a bit. It’s a quick and easy way to preserve the pumpkins so they last from September through Thanksgiving.
I love getting less traditional looking pumpkins. I try to get various colors, shapes, and textures. How cute are they?!
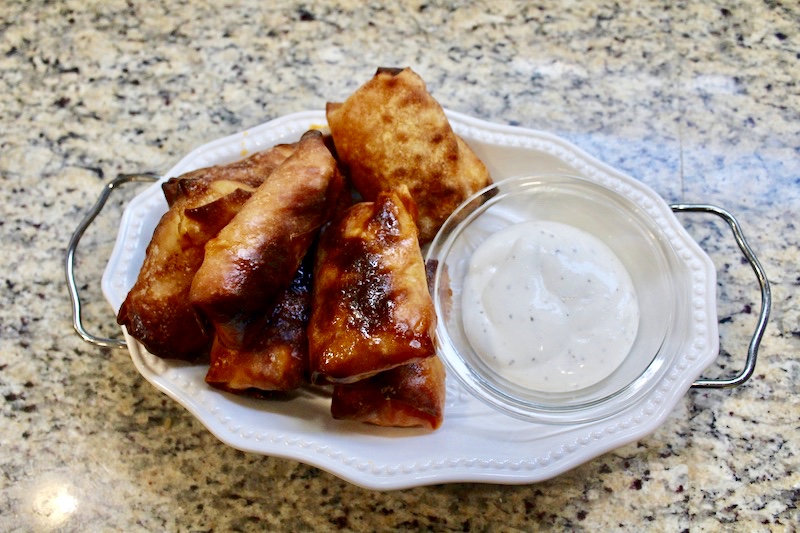
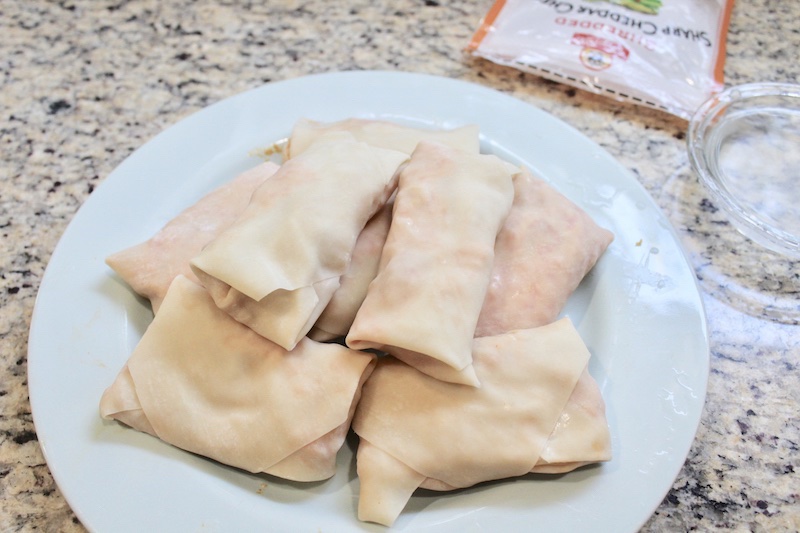
Buffalo. Chicken. Two of our family’s favorite words. There is rarely an event with my in-laws that does not include buffalo chicken dip, especially during football season. It is their love language, and who would blame them?
I was planning to make cheeseburger egg rolls for dinner one night, but then realized I didn’t have any ground beef. Then the idea hit me- buffalo chicken egg rolls! It sounded amazing, and to be honest, they are!
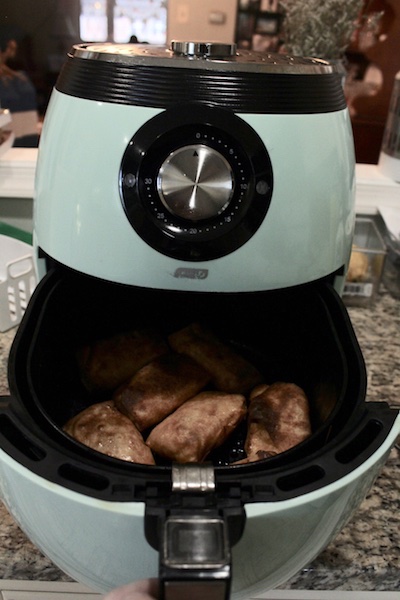
I prefer to use our air fryer because of the crispiness and the lack of oil. If you’d rather fry the egg rolls in the pan, you are welcome to do so. Just know these directions are specifically for the air fryer.
You don’t have to spray with cooking spray, but I find it helps crisp up a bit better. It’s still significantly less oil than frying them in a skillet. If egg roll folding is intimidating, please look at the photos below for the step-by-step folding process. I keep a tiny bowl of water next to me while I fold and roll. Depending on the size of your air fryer, you may need to cook these in multiple batches.
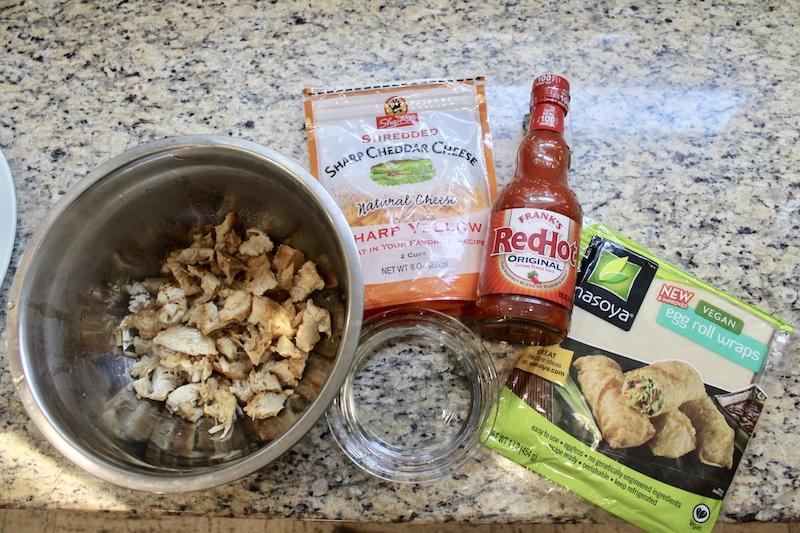
Ingredients
2 chicken breasts
1 package egg roll wrappers
8oz bag of shredded cheddar cheese
Frank’s Red Hot (hot sauce)
Pam or cooking spray
Ranch dressing for dipping
Instructions
1. Heat a tablespoon of oil in a skillet on medium heat. Slice chicken breasts in half (so they cook faster) and season both sides with salt and pepper.
2. Cook chicken breasts fully, about 5 minutes per side. Cut/shred chicken into bite-size pieces.
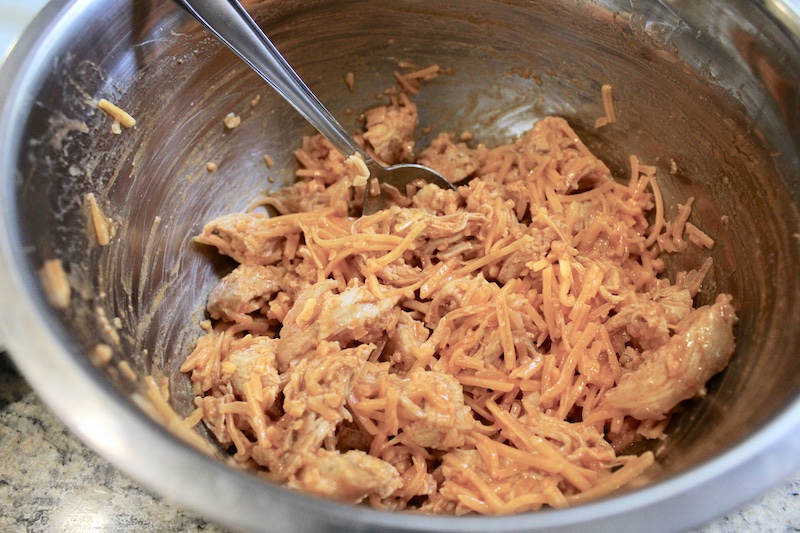
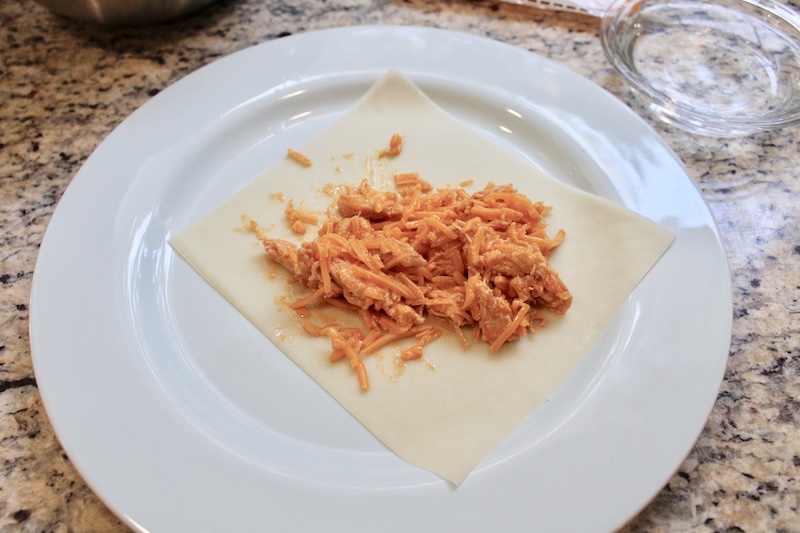
3. Add cheese and chicken to a mixing bowl. Then add the hot sauce- the amount will depend on your preferred spice levels. I add about 1/2 cup because we like spice. If you prefer a more mild heat, just give a generous drizzle.
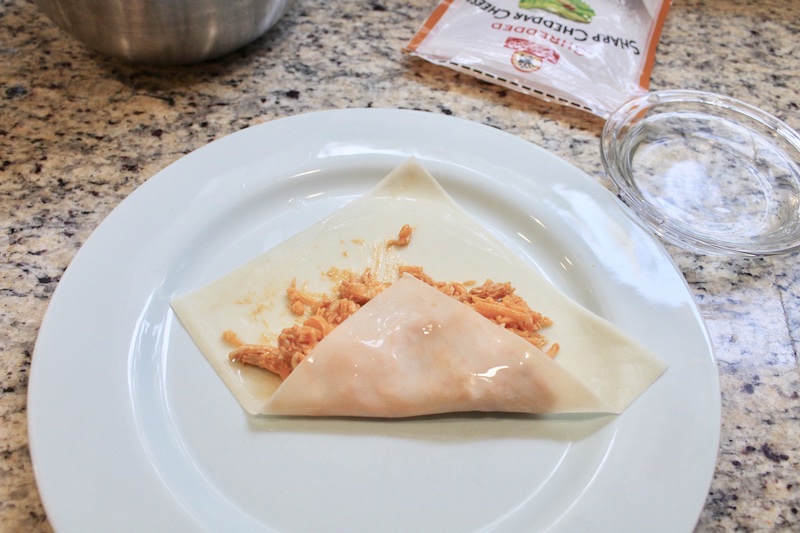
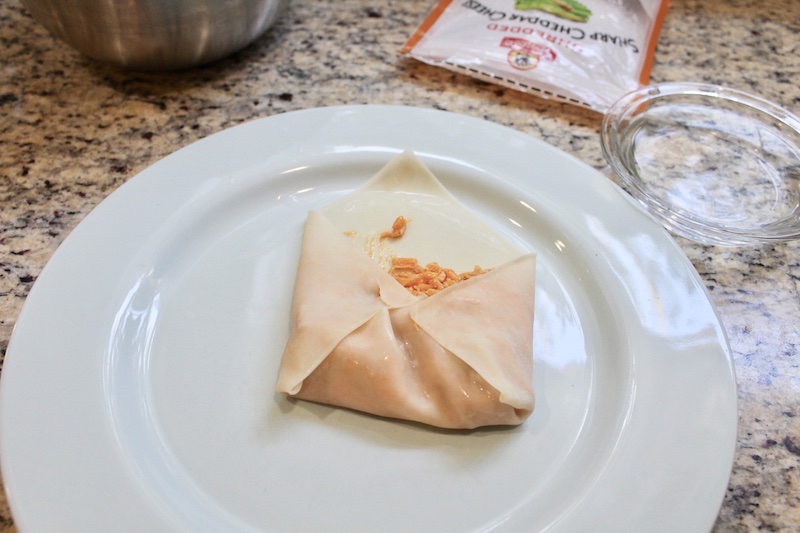
4. I preheat the air fryer to about 375° while I assemble my egg rolls. You place the egg roll wrapper in a diamond shape. Place the filling in the center, then wet your fingers with water and coat the edges of the wrappers so they stick together. Fold up the bottom of the wrapper, then fold in the sides, wet the tops of the sides, and roll the wrapper up to stick to the top. Make sure all little nooks and crannies are sealed, wetting again if need be, so no filling escapes.
5. Spray the tops of the egg rolls with Pam, then place Pam-side down into the fryer basket. Spray the top of the egg rolls lightly with Pam and cook for 8 minutes. Then turn them over a cook for another 2 minutes.
I know the folding process can be confusing, so here are some step-by-step photos to help!
1. Lay in a diamond shape facing you with filling in the middle.
2. Wet fingers and trace the edges. Then fold the bottom of diamond up.
Fold in the sides and press shut.
Roll up and repeat!
I hope you give these a try, because once you make them, you won’t be able to stop! Your guests will love you forever. Be prepared to host for every game after your family and friends try these.
Fall is finally on it’s way! I am all about cool breezes, warm colors, and pumpkin everything! Our house is covered in cute pumpkin decor and we love the flavors of the season.
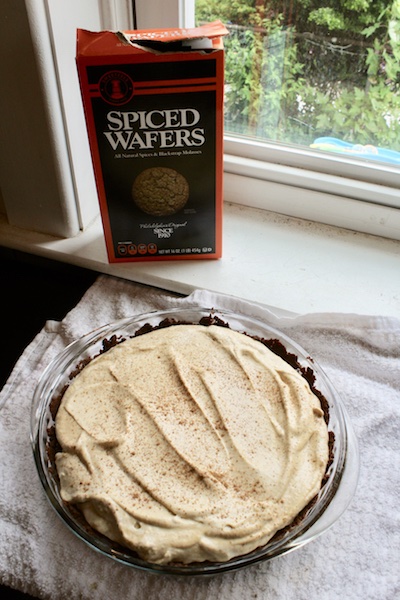
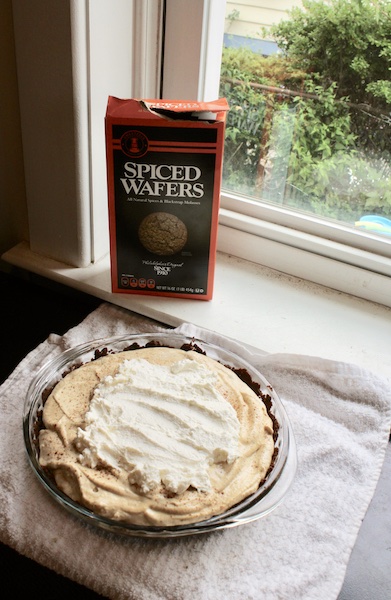
I created this pie because I love pumpkin everything, except for pumpkin pie! I don’t know if it’s the texture, but I’ve never been a huge fan. Crazy, I know. Pies just scream ‘fall’ to me, so I wanted to make a pumpkin pie hybrid. May I introduce….the pumpkin cream pie!
This simple pie just requires a quick crust bake, followed by chilling in the fridge for a few hours. It is a great make ahead pie for a party. I love the creaminess to this pie filling and the warm spices, but what I love MOST of all is the crust. I considered making a graham cracker crust, but then I remembered fall has a very special cookie all its own- the spiced wafer. Also known as ginger snaps, the spiced wafer is the most flavorful, crispy yet chewy cookie out there. I knew I had to make it the base of this fall inspired pie.
If you don’t have brown sugar on hand you may use all white sugar. I just enjoy brown sugar because of the molasses flavor. I enjoy the pie the cooler it is. You can chill it overnight, or make it in the morning and serve after dinner, giving it plenty of chill time. You can add the whipped cream topping and pumpkin spice dusting immediately before serving if you want.
Ingredients
2C Spiced Wafers (1 sleeve)
1 stick butter, melted
16oz cream cheese, softened
1C canned pumpkin
2tsp cinnamon
1tsp nutmeg
1/4tsp cloves
1 pinch of salt
1/2C plus 2tsp sugar
1/2C brown sugar
2C heavy cream, divided
pumpkin pie spice for dusting
Instructions
1. Preheat the oven to 350º
2. Put spiced wafers in the food processor and blend until crumbly. While the processor is still running, slowly pour in melted butter.
3. Pour spiced wafer mixture into a pie plate and press down and around the edges. Bake for 15 minutes.
4. While the crust cools, mix softened cream cheese with the canned pumpkin with a hand mixer until well combined. Add sugar, brown sugar, spices, and salt. Mix again.
5. Whip 1 cup of heavy cream in a kitchen aid mixer until fluffy and soft peaks form. Then fold the whipped cream into the pumpkin mixture. Pour into cooled crust.
6. Whip the second cup of heavy cream with 2 teaspoons of sugar until soft peaks form. Top the pie with whipped cream and dust with pumpkin pie spice.
7. Let the pie cool in the fridge for a minimum of 2 hours.
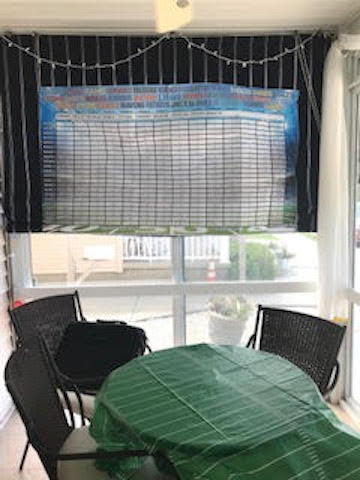
Every year, my husband’s family hosts the big family fantasy football draft. It is incredibly competitive but so much fun! His aunt and uncles host the event at their vacation home, and in-person attendance is mandatory. No virtual drafting! My husband also participates in a work fantasy football league. They draft online, but we always invite the league to come draft together at our house and have a party. We have so much fun with both drafts, so I thought I’d share how we make them special.
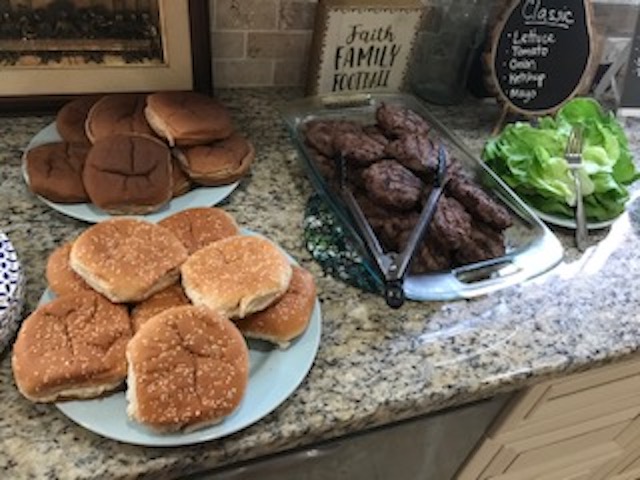
When planning food for the draft, I knew we couldn’t have a fancy sit-down dinner because everyone needed room on the table for their laptops. The food needed to be more of a grab-and-go style so people could fill their plate quickly before their next draft pick. I also didn’t want to make something that required a fork and knife since they are on their laptops. They need 1 hand free.
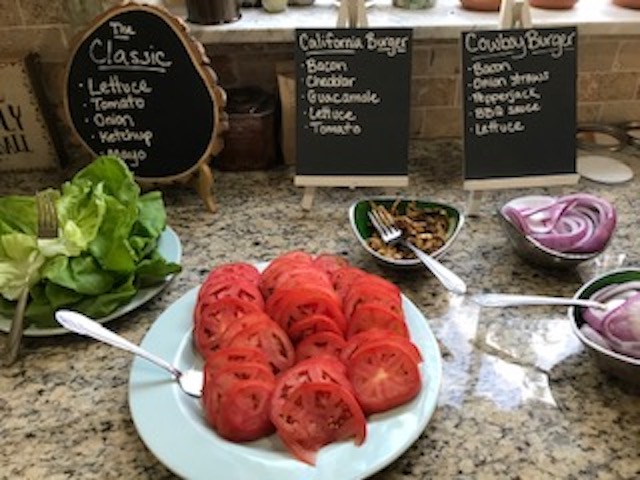
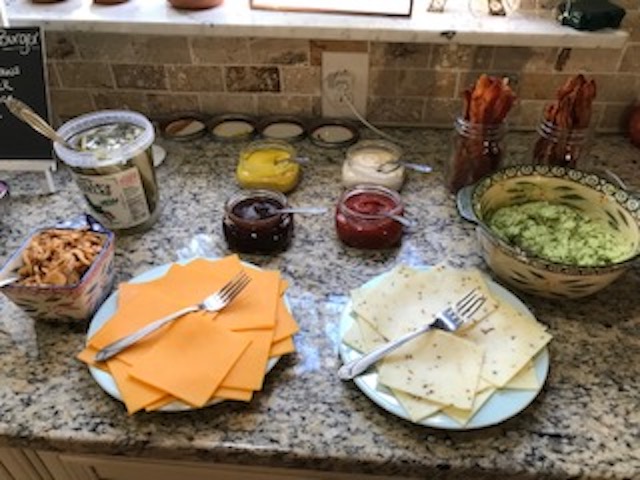
I decided to make a burger bar- we grilled lots of burgers and set out every topping imaginable so everyone could build their ideal burger. We had 2 types of buns, whole wheat and white seeded buns. Wheat buns make burgers a whole food, right? Next year I think I may get brioche buns and maybe a few pretzel buns. Yum. Anyway, I caramelized some onions ahead of time, cooked a ton of bacon, chopped all the veggies, made some guac, and put the cheeses on platters. Then I made fun chalk board signs with descriptions for popular types of burgers. Here are some examples. Feel free to write out any favorite combinations your family likes or from your favorite restaurant.
California Burger: bacon, cheddar, guacamole, lettuce, tomato
The Classic: lettuce, tomato, onion, ketchup, mayo
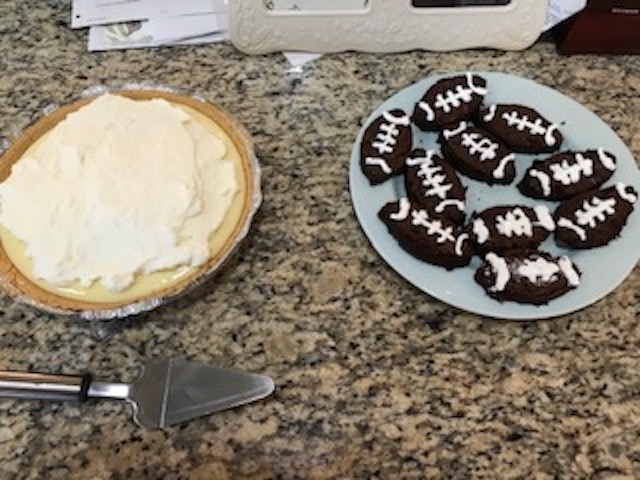
You get the idea. The possibilities are endless. I also made a batch of brownies for dessert and cut them into football shapes. Then I just added a bit of white icing. They were cute and easy to grab! I made a lemon pie too, because why not? Not on theme but still good 🙂
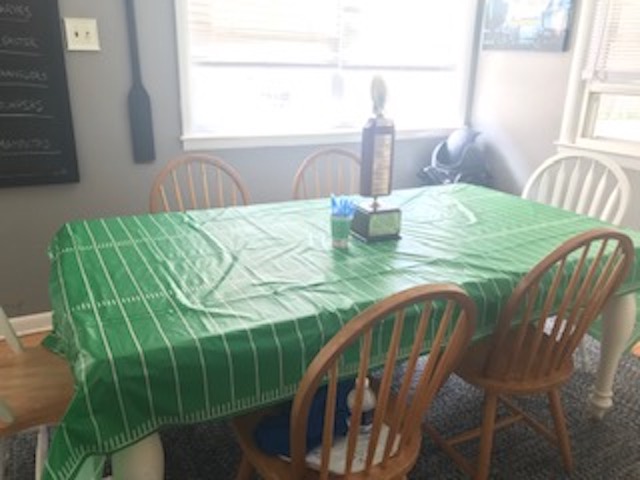
We also like to decorate for the drafts. This includes some football-themed paper goods, tablecloths, and a draft board. You can find these online. They are fun to have hung up so everyone can look at each team’s players after the draft and give first impressions. Filling in the draft board is a fun job for a spectator at the draft, like a significant other or relative that is there for the party but doesn’t need to draft themselves.
Even if your draft is online, I recommend getting together for the event. Computers are great, but nothing beats being face to face.
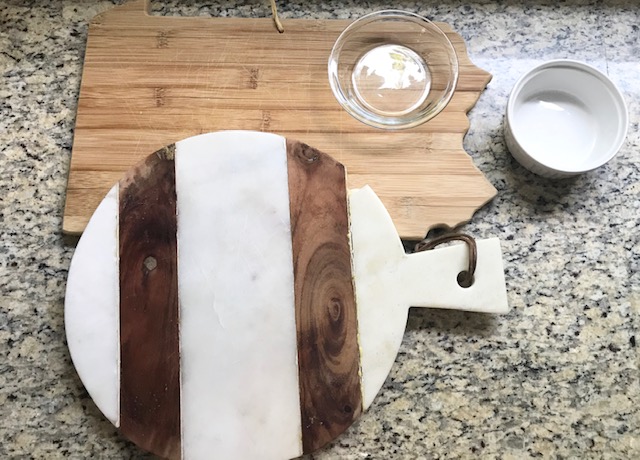
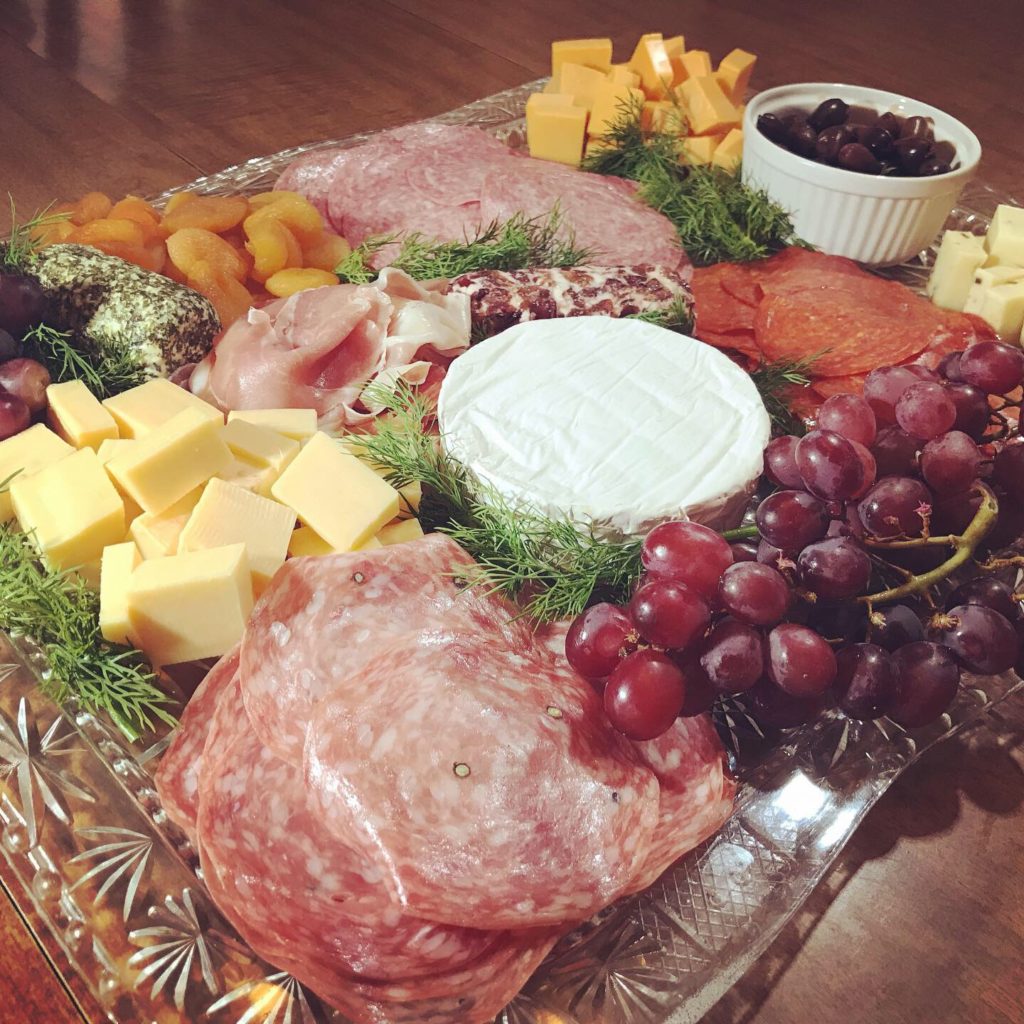
Charcuterie boards are a great appetizer for parties or surprise guests. They look beautiful and there’s something for everyone. All you need is a platter, a few small cups, and easy ingredients.
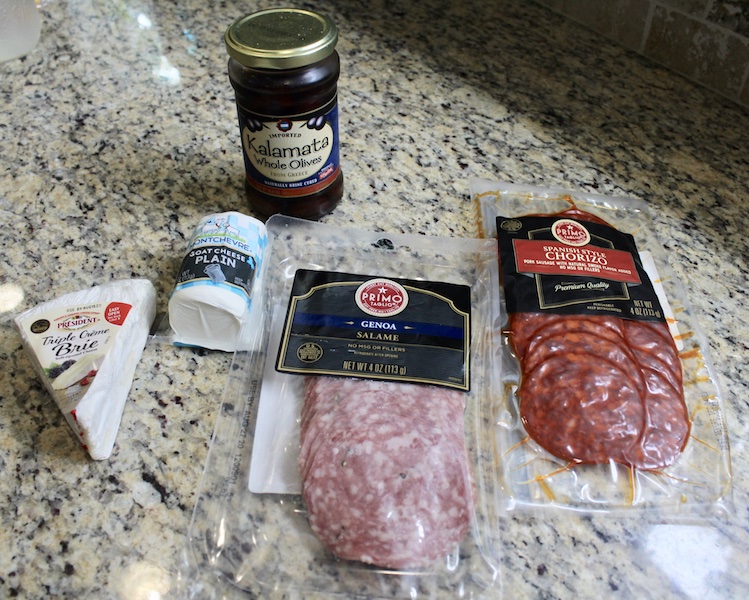
The main ingredients for a charcuterie board are meats and cheeses. I like to get a variety of Spanish and Italian meats and a mix of soft and hard cheeses. Goat cheese and brie and great options for soft cheese. Some good, crowd-pleasing options for hard cheese would be cheddar, gouda, and a spicy cheese like pepper jack.
Some other good snacks for the board are fruits. I include fresh and dried options, like grapes and dried apricots. I also love to add olives in a small cup so the briny juice doesn’t leak all over the platter. You can also add nuts to the platter, but with nut allergies in the family I always make sure to put them in separate cups or off to the side of the board.
Charcuterie Goodies
Arranging the charcuterie board is the most fun! I like to start with a wheel of brie smack in the middle of the platter. It may be because brie is my favorite cheese, but I think brie centers the board nicely. Then I place the meats in different piles on the board, making sure to spread them out. I try to fluff them a bit so they are easier to grab with tongs or a toothpick. They stick together if you leave them lined like they are in the packaging. Next, I spread out my cheeses, doing my best to have hard and soft options from any angle. I fill in the rest with my fruit and olives, trying to spread out the colors so the platter is balanced. For example, I don’t put my white cup of olives directly next to the brie, and I don’t put the orange apricots next to orange cheese. It just makes the presentation nicer when the colors are distributed throughout the board. Finally, I take fresh herbs to line the different foods so there’s not too much cross-contamination. This ensures people can take anything off the board as well as offers a nice green color to the platter.
I typically serve the charcuterie board with fresh sliced baguettes and various crackers. These can be put on the side, or if you don’t have quite as much variety on your board, you can place them right on.
I love the versatility of charcuterie boards. They allow for creativity and are easy to create with things I can store at home. I keep meats, cheeses, and olives in my fridge, apricots and crackers in the pantry, and we usually have fruit. If someone stops by to visit unexpectedly, this is a great spread to put out that will make your guests feel special.
Big events with friends and family can feel overwhelming for any host, whether you entertain often or are hosting for the first time. I wanted to share some simple tips for hosting so you can confidently say yes to welcoming loved ones into your home.
Choose a Menu That Benefits You
It can be tempting to come up with a fancy menu to show off for guests, and if it you have the time and energy to do that, go for it! That being said, there is no need to put more pressure on yourself than is good for you. If you are stressed by planning parties, or have time constraints because of work or children, plan a menu that can be done mostly ahead of time to spread out the work. I love crock pot recipes for parties because I can usually make the recipe the day before, or even the week before it freezing is an option. Then the morning of the party I just toss the food in the crock pot and leave it alone while I set up. One of my go-to recipes is My Favorite Meatballs. I brown the meatballs early in the week, let them cool, and freeze them. They still taste great even after being frozen! I refer these to store-bought frozen meatballs because you can control/adjust the ingredients as needed for food allergies, and you know they haven’t been frozen for months.
Meatballs!
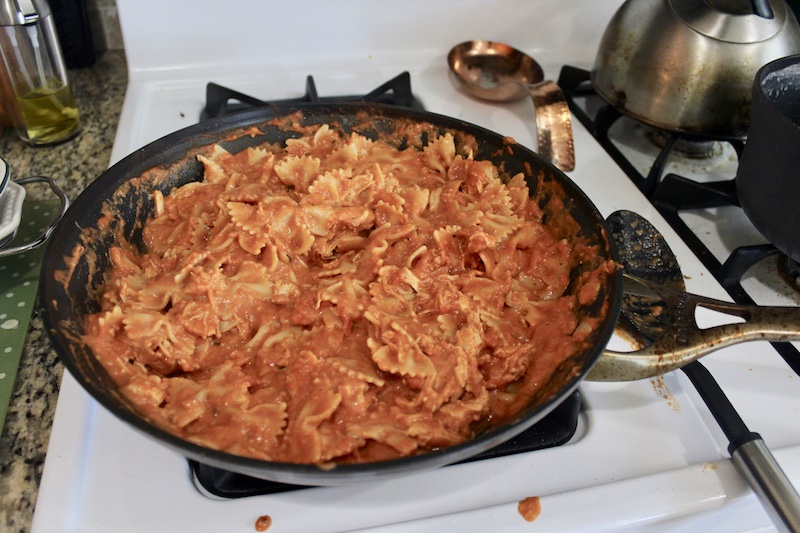
I also like to make pasta dishes ahead of time. Pasta can be cooked the day before- just cook, toss in a bit of olive oil so it doesn’t stick together, cool, and store in a plastic bag or container. I also make the sauce ahead of time, cool it, and store it separately. I just combine the pasta and sauce the next day and reheat. Just be sure not to dry it out! You can heat the pasta at 325 degrees. Then, once hot, serve immediately or lower the heat to 250 degrees to keep warm until you’re ready. This saves a lot of time sweating over the stove on the day of the party. My favorite pasta dish right now is Spicy Creamy Bowties.
Spicy Creamy Bowties
Be Prepared
This may seem like an obvious tip- be prepared. Let’s get specific…
If I plan on baking a dessert the morning of a party, I make sure to set up the ingredients ahead of time as much as I can. I combine the dry ingredients and leave it in a covered bowl so I don’t need to clean a bunch of measuring spoons before the party. I make sure to leave butter out to soften if I need it. I measure out as much as I can ahead of time. This makes my morning much smoother and eliminates many day-of dish washing.
If I need to cook the day of, I like to measure and chop as many ingredients as possible ahead of time. Again, less dishes in the morning! I try to put all the clean dishes away and wipe down the counters the night before so I only need to clean a small area immediately before guests arrive.
Chopped veggies for tomorrow’s veggie tray
I also like to set the table, if possible. This can be at night before bed so we can still use our table for dinner. Setting the table saves time and spares me some anxiety the day of the party. I also set out the crock pots and serving dishes where I want them. Same goes for decorations. Outside of helium balloons and fresh flowers, I do all decorating ahead of time. This makes setting up on the day so smooth and simple.
All set up the night before!
Make a Checklist
I usually have a checklist in my planner for the day of the party as well as the days leading up to the party. I try to put them in order of what needs to be done. General dusting/vacuuming, clean bathrooms, mop kitchen, prep food, etc. all go on the list for the days before. The day-of list includes all details for food in a timeline so I don’t forget something I made ahead and threw in the fridge. I also write things like ‘turn on all lights’ and ‘light candles’ so the house feels welcoming. It’s easy to forget those little details when rushing to get ready. Make sure to leave time to get ready and wear an apron when setting out food so you don’t spill on your outfit before people arrive. Speaking from experience on that one!
That’s it!
I hope these tips give you the confidence to invite family and friends over without anxiety over the preparations. Providing a gathering place has brought us so much joy, and I hope the same for you! Do you enjoy hosting? Let me know if you have any other tips!
Looking for a quick meal that is simple and delicious? You’ve come to the right place! These Spicy Creamy Bowties are a fun alternative to typical pasta with red sauce. This recipe requires minimal effort and packs lots of delicious flavor.
I created this dish to satisfy our love of spicy food with the decadence of a cream sauce. I enjoy a good alfredo dish, but the sauce can be so heavy and high in calories. This sauce marries the richness of a cream sauce with the flavorful punch of a spicy sauce. It takes no time at all and the results are so worth it!
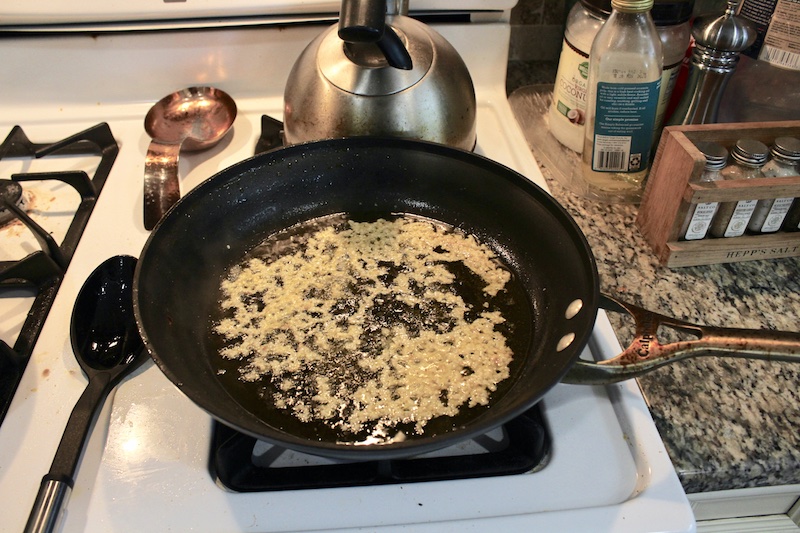
I start out by boiling water for the pasta and sautéing garlic in olive oil. Be careful not to burn the garlic!
Can you smell that garlic??
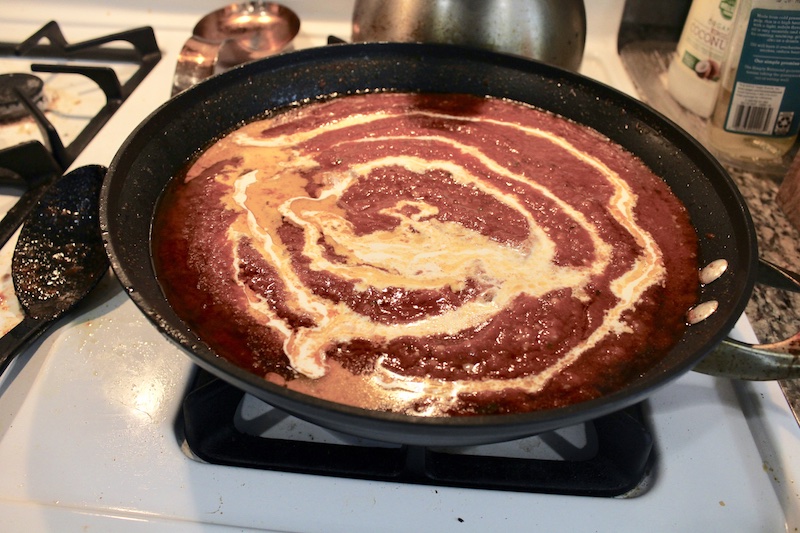
I then add the red sauce, spices, cream, and cheese. Give it a good stir and check the spice level. Don’t go full throttle on the red pepper at first. Taste it and add as desired.
Yummmmm
Cook the pasta in boiling water according to box instructions. While the pasta cooks, let that sauce simmer and take in the delicious smells.
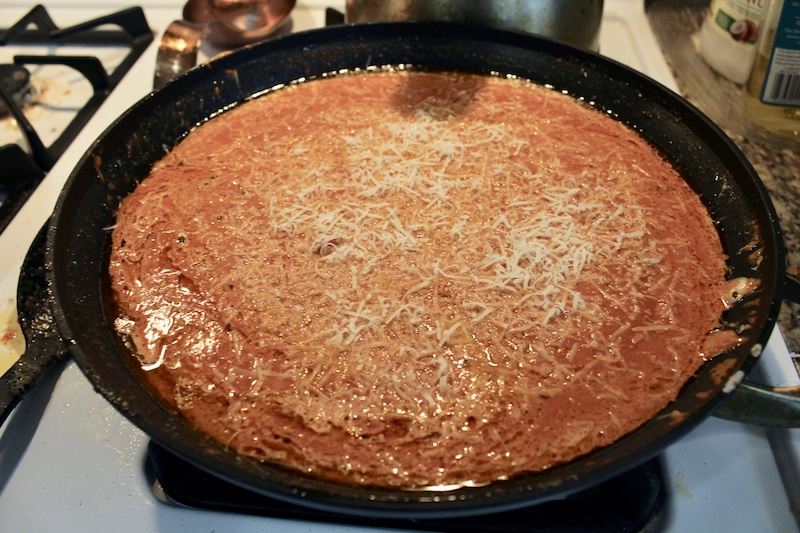
Who doesn’t love parmesan cheese?
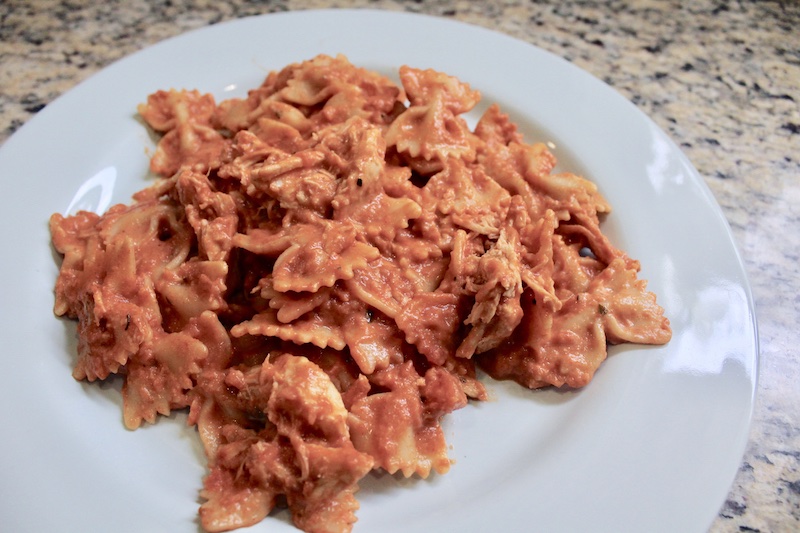
Once the pasta is cooked, go ahead and throw it in that decadent sauce. Add the chicken or meat if you desire. Both are excellent. This recipe is sauce-dominant, so go ahead and serve this dish with lots of fresh, crusty bread to dip it in.
My husband and I love spice, so we use more ground red pepper. You can taste as you go and decide what you can handle. If I make this pasta for a party, I err on the side of mild-medium spice. Not every guest can take the heat. I’ve made this recipe with spicy sausage and chicken. Both are delicious! You don’t need to add meat, but I prefer to have the protein. We like very saucy pasta dishes. This recipe makes the sauce to pasta ratio a bit high. I just serve with fresh bread to soak up the extra sauce.
Ingredients
1 box bowtie pasta
2 jars pasta sauce (I like Barilla Traditional)
1 C heavy cream
1/2 C fresh grated parmesan cheese
2 TBSP minced garlic
1 TBSP olive oil
1 tsp onion powder
1 sprinkle salt
1/2 tsp fresh black pepper
1-2 tsp ground red pepper (cayenne), depending on preferred spice level
2 chicken breasts, cooked and chopped (optional)
4 spicy sausage links, cooked and cut into discs (optional)
1 loaf fresh bread to dip into the sauce
Instructions
1. Bring a pot of water to a boil
2. Heat skillet to medium heat. Cook minced garlic in olive oil for a few minutes until fragrant, making sure not to burn garlic.
3. Carefully pour in pasta sauce and mix with olive oil and garlic. Add seasonings, cream, and parmesan cheese. Mix thoroughly and let come to a gentle bubble.
4. Once pot of water is boiling, cook bowties to desired texture. I prefer al dente. Follow box instructions for cook time.
5. Let sauce simmer in the pan until the pasta is ready.
6. When pasta is cooked, add directly to the sauce pan and serve! If you want to serve later, let both cool separately and store in the fridge. Add a bit of olive oil to the pasta so it doesn’t stick together.
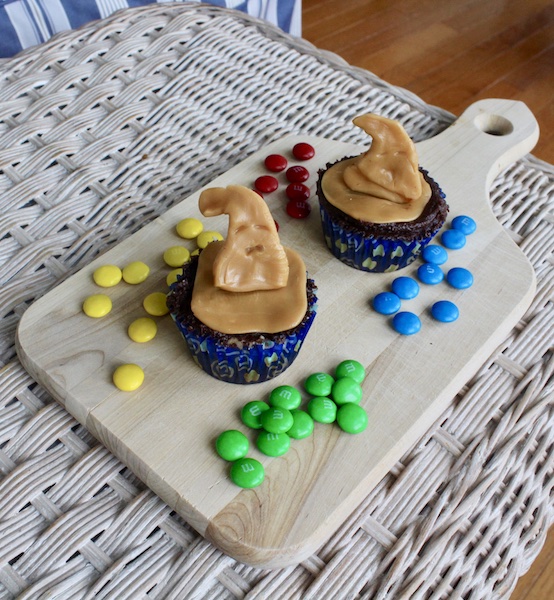
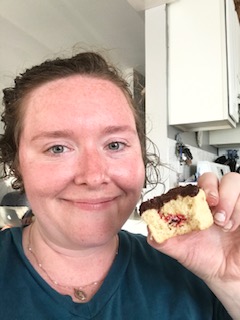
My sorting hat cupcake with my @SweetSequels Harry Potter tee!
I was never a great reader growing up. I had my favorite books growing up, but I was never a book worm. Then, when I was 22, I read the Harry Potter series. I fell in love with the characters and the story. This began a love for reading I never had before, and I’m so grateful.
I first made these for my sister-in-law’s bachelorette party. She loves Harry Potter so her party was HP themed. My college roommate is also a big Harry Potter fan, so when I found out we were seeing each other on July 31st, Harry Potter’s birthday, I knew I had to make my sorting hat cupcakes!
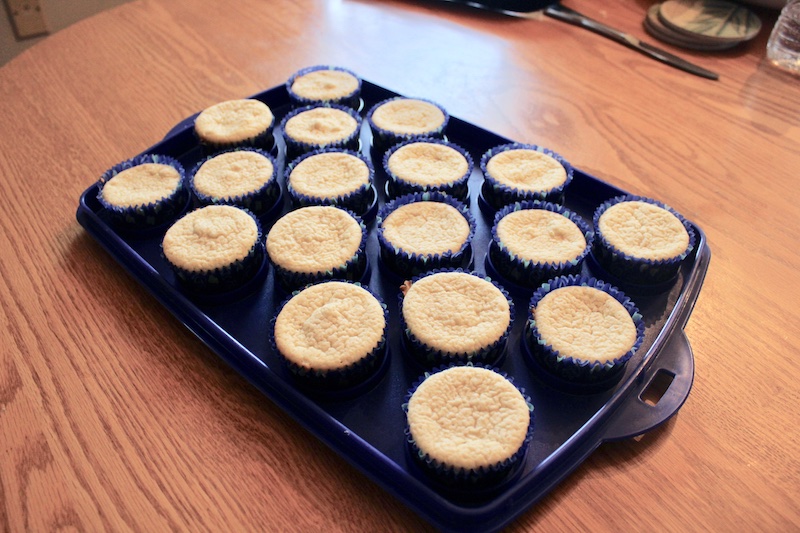
Cupcakes baked and cooled
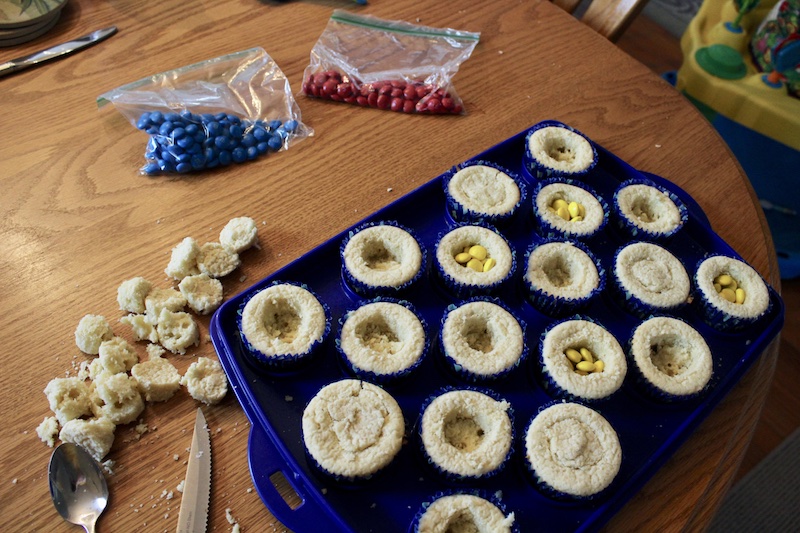
You can use any cupcake recipe you want. Box mix is fine. I mostly like to bake from scratch, but these cupcakes are more steps than usual, so no judgment on the box mix. Bake your cupcakes according to the instructions. While the cupcakes bake, pour out a family-sized bag of M&Ms and separate them by color. Go ahead and eat the brown and orange ones, or save them for later 🙂
Filling the holes to sort some Hufflepuffs 🙂
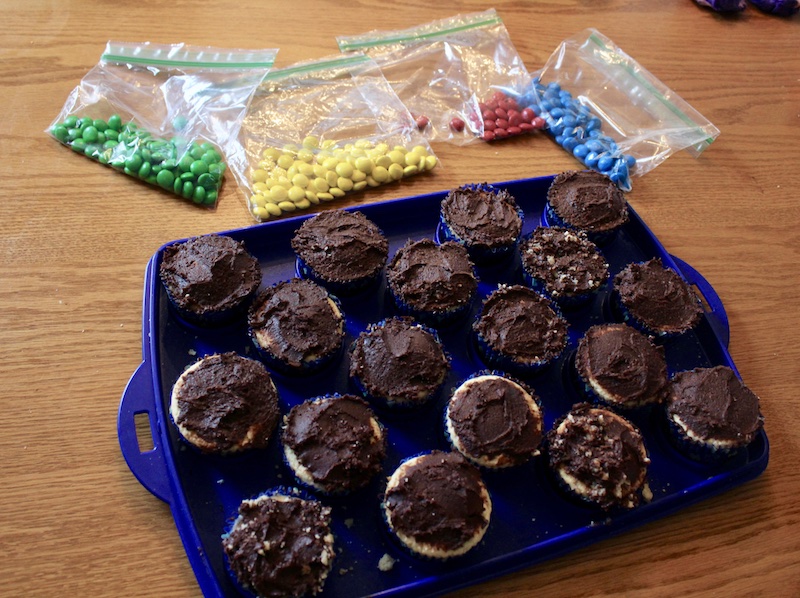
Once the cupcakes are baked and cooled, hollow out the centers of the cupcakes. I made 18 cupcakes, so I filled 3 cupcakes with green M&Ms, then 5 cupcakes each with blue, red, and yellow M&Ms. I knew the kids would be bummed to get Slytherin so I made less green. No one wants to be “that bad guy, Malfoy”. Cover the holes back up with the cupcake centers. Then cover the top with frosting. Store bought or homemade is fine. Flavors are also flexible, just make sure you cannot see any M&M colors sticking out. I used yellow cupcakes with chocolate frosting.
All cupcakes filled and frosted
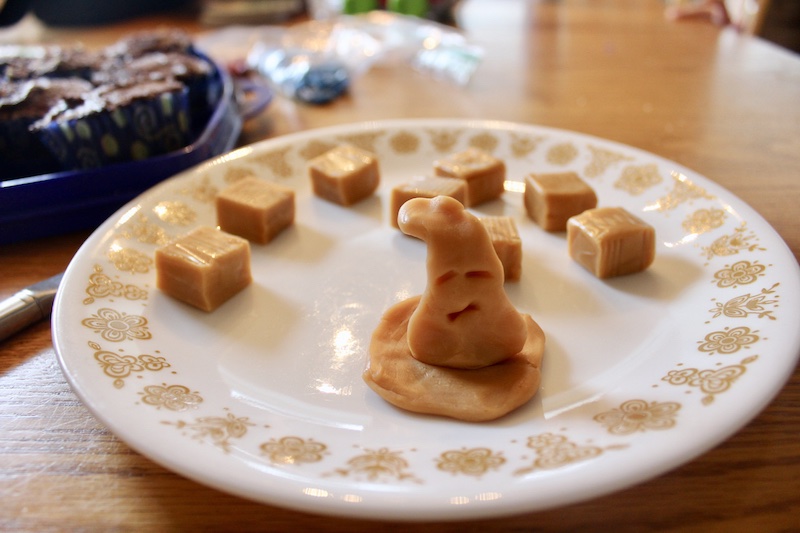
Here comes my favorite part! I bought little individual caramels to form into sorting hats! Each hat is made of 2 caramels, so 36 total. I unwrapped about 10 caramels at a time and put them in the microwave for 10 seconds so they were easy to form. I shaped the first caramel into a disc shape for the base of the hat. Then I stretched the second caramel into the top of the hat with a bend to the side. I pushed the two pieces together while they’re still pliable. Finally, I used a butter knife to indent two eyes and a mouth onto the hats and placed them on top of the cupcakes. I love how they turned out!
Forming the sorting hats! They don’t have to be perfect. Just have fun with it!
The sorting was so much fun! I was happy to get Gryffindor! If you try these let me know what house you get! Happy sorting!
So you love hosting but you need to keep costs down? This is the post for you. I also love entertaining, but going out of control on the budget is not good for our family, plus we won’t be able to entertain again! Here are some of my go-to staples I always have on hand for hosting.
Candles
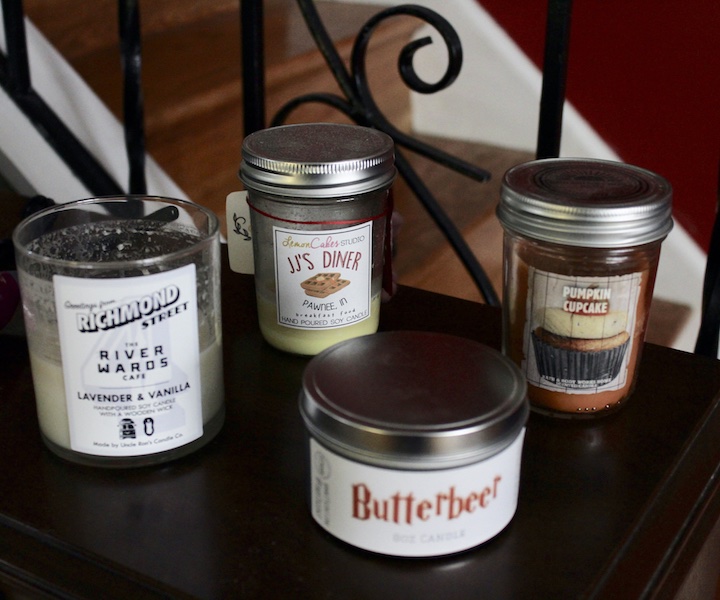
You want your house to smell good when people walk in. Candles also warm up a space and make it feel cozy. I love Yankee Candles because their smell really fills the room. I know they can be expensive, but I’m on their email list and get coupons for buy 1 get 2 free candles regularly. That’s a great deal! It makes them much more affordable. If they still seem too pricey after that discount there are other good brands out there. I also love Bath and Body Works Candles, and their email coupons can have some good discounts. I suggest buying a few candles in your price range and testing them out at different times. A lower price tag may mean low quality, and there’s no point in burning a candle that you can’t smell. Keep the smells pleasant and neutral. Safe scents could be vanilla, fresh linen, and lemon. I love pumpkin, coffee, lavender, and anything named latte or cookie. Floral candles can be nice too but sometimes they are strong so be careful! Our out of town visitors also love local anything, so I also get some candles from a local small business. Obviously, the possibilities are endless so pick something you like that isn’t too intense.
Some favorite candles: Uncle Ron’s River Wards Candle, Lemon Cakes JJ’s Diner Candle, Bath and Body Works Pumpkin Cupcake Candle, and ET Scent Butterbeer Candle
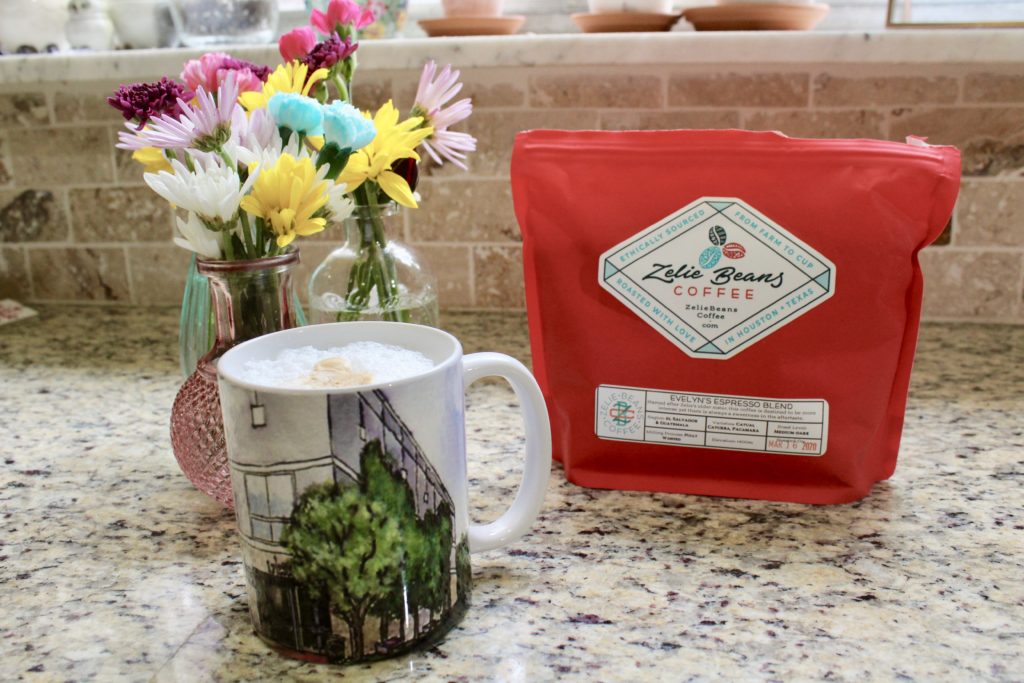
2. Coffee and Tea
I think most of us have coffee and tea in our house for personal use. If for some reason you have no dependency on caffeine, I suggest you buy some coffee and tea just to keep in the cabinet or fridge for when guests come. If you don’t want to buy a coffee pot or don’t have the room you can buy a French press. They are cute, affordable, small, and easy to store. You use hot water from the tea kettle to make coffee. It’s ideal to have options for regular and decaf. Most people would agree hot beverages enhance their interactions and make them comfortable. So settle in with a mug!
My favorite espresso beans from Zelie Beans Coffee
3. Cookie Dough
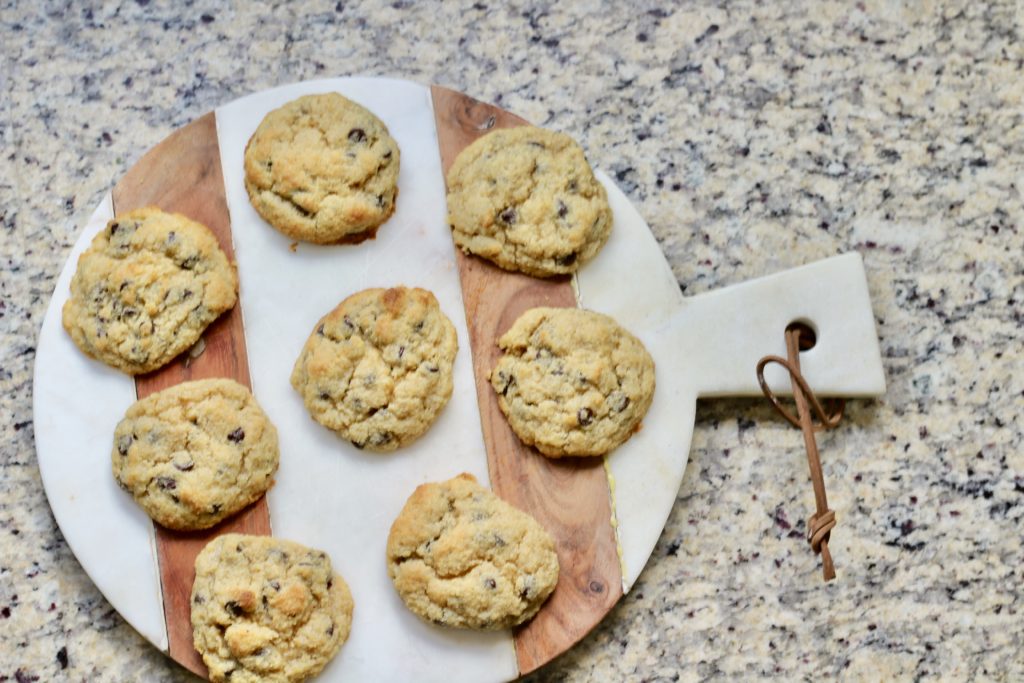
I enjoy making cookies from scratch as much as the next girl, but some days I don’t have the time. I like to keep ready-made cookie dough handy in case I get last-minute guests so I have something to serve them without going crazy. You can buy cookie dough to keep in the fridge, or if you’re a stickler for homemade, just make a big batch of dough and freeze it into small sections. I’ve done this many times and you can take cookie dough from freezer to oven, just keep an eye on them. The baking time may vary by a few minutes.
Favorite chocolate chip cookies
4. Alcohol
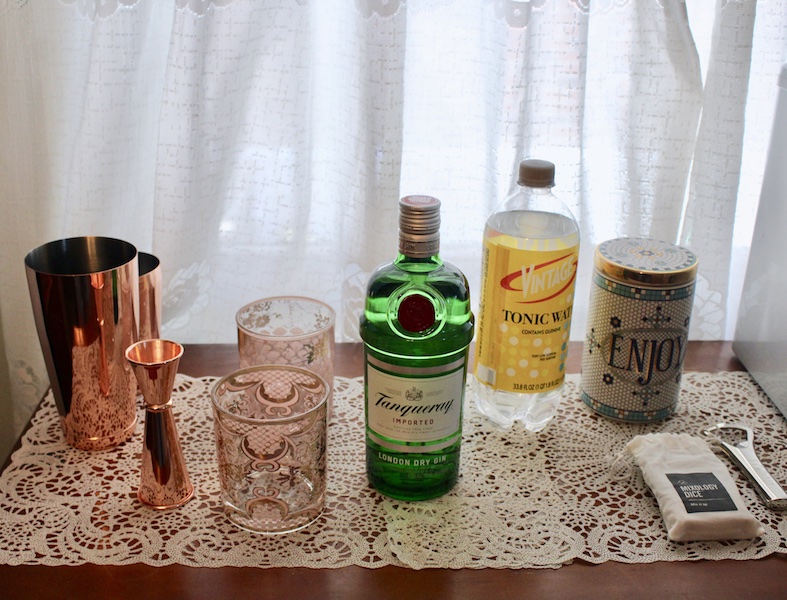
We always keep a few beers in the fridge, a bottle or two of wine, some gin, and tonic water in the house.This way if friends decide to come over for a nightcap after dinner we are ready to accommodate them without having to stop at the store on the way home. You don’t need a fully stocked bar all the time. Just have some favorites ready to serve. Buy what you like so it doesn’t go to waste, and if you have regular guests that love a particular drink, keep that handy too. They’ll feel so loved if you have their preferred beer or specialty cocktail on hand.
Always ready for a Gin and Tonic
5. Cheese & Meat Tray
I usually keep a few blocks of various cheeses and some Spanish or Italian meats in my meat drawer. They usually keep for awhile unopened. I also try to have crackers or a loaf of French bread in the house as well. These trays are always a hit and if they get near the expiration date, just have a tapas-style dinner so nothing goes to waste. We love meat and cheese so it almost never goes uneaten. Other things to elevate your charcuterie board are olives, grapes, hummus, cucumbers, and carrots. The possibilities are endless.
I hope I’ve given you a few ideas to help you confidently accept last-minute guests. Happy hosting!
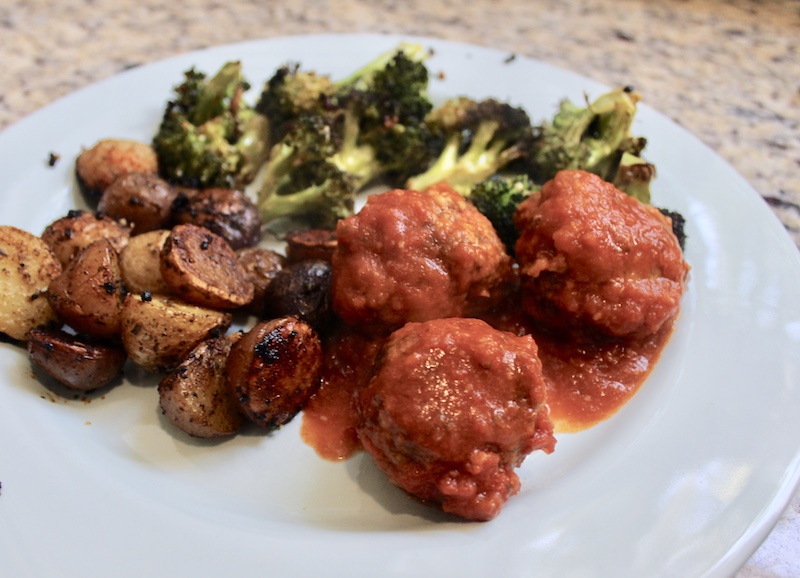
These are my all-time favorite meatballs. They are easy to make, full of flavor, and perfect for any occasion.
I’ve made these meatballs for small dinner parties, potluck events, big Christmas parties, and countless family events. They are great on their own, on a roll, over pasta, or served with roasted potatoes. I love the simple prep and setting them in the crockpot- you leave them to cook for hours and they maintain their juiciness. No dry meatballs!
Nice and browned 🙂
The most important thing is to brown the meatballs on both sides. Just broil them in the oven to give them a bit of a crust so they don’t fall apart in the crock pot. Also, roll the meatballs gently so the meat doesn’t become tough!
Served up with potatoes and broccoli
These meatballs can be frozen after they’ve been broiled and cooled. I like to make a batch and freeze them into servings of 4 so we can have them for dinner and lunch the next day. So simple!
If you want to freeze them for later, I suggest broiling them first, letting them cool, then freezing them in the amounts you need. If you’re gluten free, you can sub gluten free breadcrumbs. If you’re THM, you can toast sprouted bread, break it up in the food processor, and add 1/2tsp Italian seasoning for a crossover. To keep the meatballs an S, use dusted pork rinds with 1/2tsp Italian seasoning. The texture isn’t quite the same but it’s pretty close!
Ingredients
4 eggs
1/2C milk
2lbs ground beef 80/20
1lb ground Italian sausage (mild or hot)
1 1/4C Italian breadcrumbs
1/3C fresh grated parmesan
1/2tsp garlic powder
1Tbsp salt
1/2tsp pepper
Plus 2 (24oz) jars pasta sauce (I like Barilla)
Instructions
1. Whisk up the eggs. Then add the milk and seasonings.
2. Add the beef and sausage by breaking them up into small bits so they are mixed evenly. Mix into egg mixture.
3. Sprinkle breadcrumbs and parmesan over the mixture and combine with your hands. You want to mix gently. Don’t overwork the meat.
4. Turn the broiler to high. While the broiler is heating up, roll about 40 meatballs and place on 2 greased baking sheets. Roll gently- again, you don’t want to overpack the meat. Roll enough that the meatballs keep their shape, but not so tight that they don’t get juicy.
5. Broil the meatballs for 4 minutes on each side. Pull out of the oven to flip and broil another 4 minutes on the other side. Be careful not to burn yourself!
6. Place meatballs in the crock pot with the pasta sauce in layers so each meatball has some sauce on it. Cook on low for 4 hours.